 Refractory Hypoxemia: Now maybe you have intubated a patient secondary to hypoxemic respiratory failure who is at high risk for the development of acute respiratory distress syndrome (ARDS). These patients, and really all patients, with exception of severe obstructive disease, I set up the ventilator to deliver 6mL/kg based on ideal body weight (not actual weight). Regardless if this is a pediatric or adult patient, I am setting up the ventilator to target 6 mL/kg of IBW. I can accomplish this with either pressure mode, where you set the pressure, but closely monitor the tidal volumes the patient is receiving.
Remember, if compliance is decreasing (stiffer lungs) then it may take higher pressures to deliver adequate tidal volumes, and if compliance is increasing (stretchier lungs), then you may have to decrease the pressure, so tidal volumes won’t be too large. If you want to use a pressure mode of delivery and get the benefit of decelerating flow breaths, but don’t want to keep adjusting the pressures based on compliance, then a mode we discussed in part 1 may be helpful known as pressure regulated volume controlled. This is the mode is where the imaginary respiratory therapist was shrunk down and put in the ventilator with the job of delivering a set tidal volume with the lowest pressure possible. Another option is to simply put them into a volume mode of ventilation, where you can specifically target the tidal volumes safely, and keep in mind there is no great data showing one mode is superior to another.
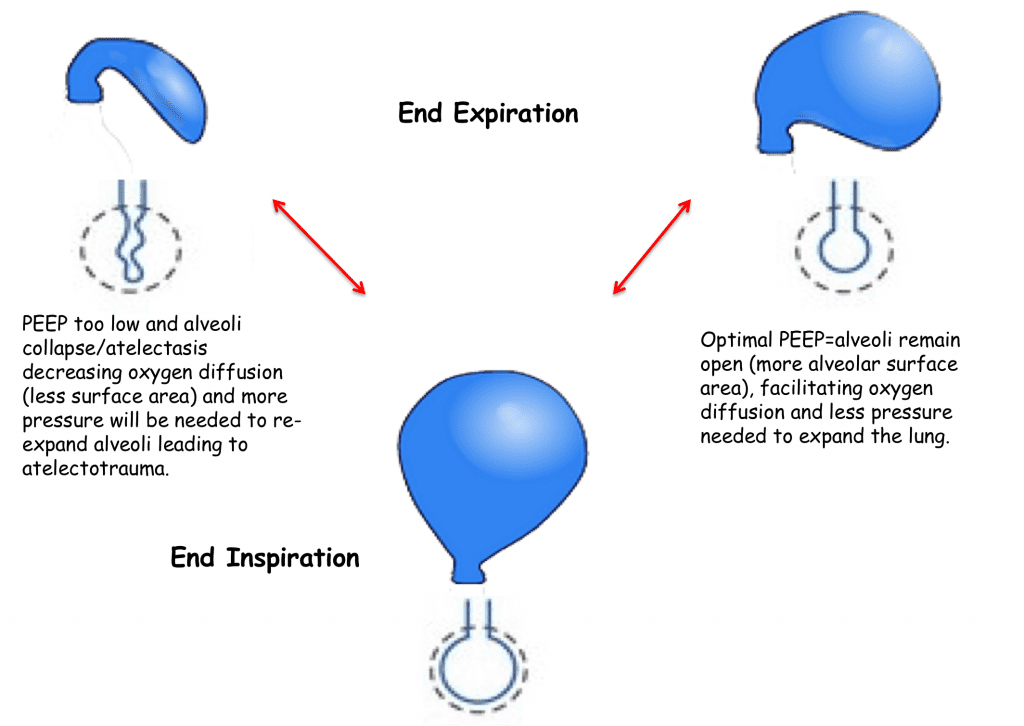
Once I choose my mode I make sure I set their PEEP appropriately, but there are many methods to set up and choose an ideal PEEP level and many clinicians and centers have different and acceptable ways to do this. I will simply refer you to figure below and the importance of choosing an adequate PEEP to improve oxygenation and prevent further lung injury. Ideal PEEP can vary over time depending the evolution of your patient’s lung injury.

I also see many clinicians keeping patients on 100% fi02 and weaning it very slowly, which is a harmful habit! I urge you to perhaps initially keep your patient on 100% especially if they desaturated during the intubation just for 1-2 minutes to re-oxygenate, but THEN quickly wean their fi02 to <60%. There are many harmful effects from hyperoxia related to the production of reactive oxygen species leading to cellular injury, cell death and systemic inflammation.
So after I intubate, I will quickly turn the fi02 down to 40% and then give more oxygen (if needed) to keep my oxygen saturation between 90-94% (ARDSnet goal 88-95%). I consider it an emergency if my patients cannot wean to less than 60% within a few hours of intubation. I give them a few hours, as usually their hypoxemia may be secondary to atelectasis and they simply need some time to re-recruit their alveoli. In the meantime, I start to consider further interventions such as re-adjustment of my PEEP, paralysis, prone positioning and perhaps if these measure fail, ECMO. So weaning fi02 quickly and finding out early the severity of their hypoxemia is crucial in order to start early aggressive therapy.
The main keys in these patients are to maintain a lung protective strategy; a term used frequently in ARDS, but should be applied in all patients to avoid VILI. The components are to keep their tidal volumes low, 6mL/kg based on IBW, optimize PEEP, and aim to keep PPlat <30 mm Hg.
Choosing Your Initial Settings:
I hope you now see what physiologies to consider when setting up the ventilator and your goals in each. If they don’t have a severe metabolic acidosis or obstructive physiology then I set up the ventilator the same for my refractory hypoxemia and everyone else to maintain a lung protective strategy even if they don’t have very significant lung disease. Maintaining a lung protective strategy can avoid ventilator induced lung injury and harming your patients.
Oxygenation:
Fraction of Inspired Oxygen (fi02)
You need to select an amount of fi02 between 0.21% – 1.00%. As I mentioned I usually give my newly intubated patient a short amount of time receiving 100% then quickly turn the dial down to 40% but trying to keep them < 60% to avoid the harmful effects of hyperoxia. Of the options that control oxygenation, fi02 is your more injurious, so don’t keep your patients on 100% and wean slowly, but start at 40% and titrate upwards to keep oxygen saturations 90-94%.
Mean Airway Pressure:
There is unfortunately no dial you can turn that says mean airway pressure. To optimize our mean airway pressure and provide effective oxygenation then we need to set an optimal PEEP level. I usually choose 5 mm Hg of PEEP at the lowest level of PEEP I set for my patients, but your PEEP may need to be set much higher based on your patient ideal PEEP as we discussed earlier.
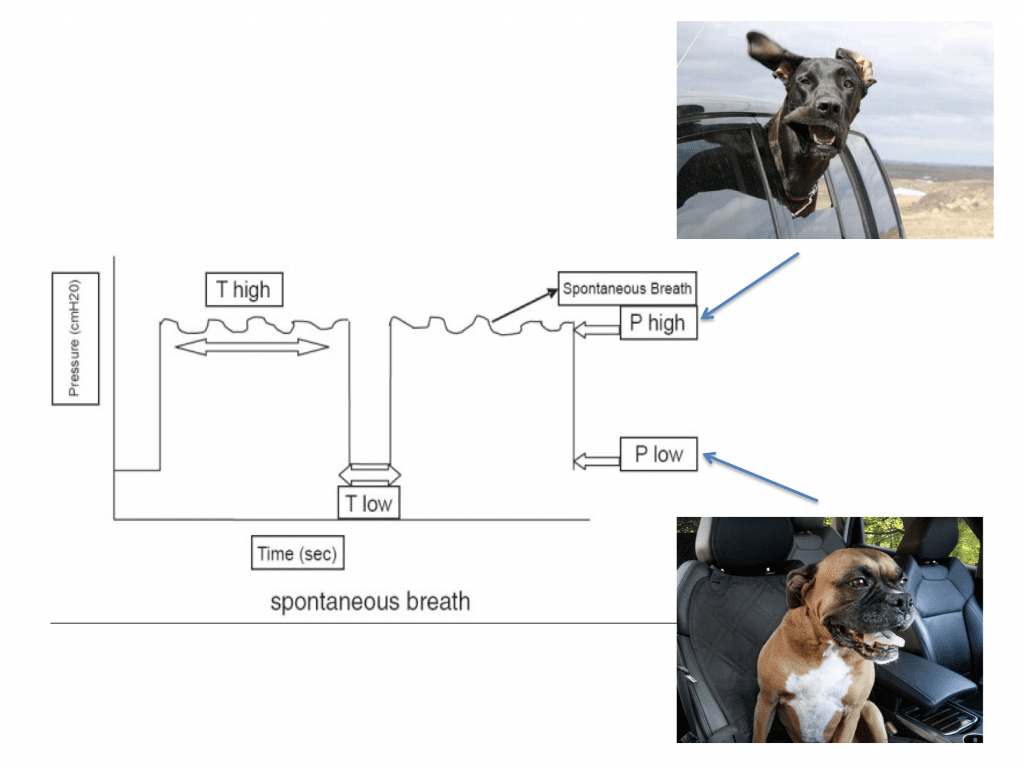
In APRV, the patient can breath spontaneously and therefore comfortable. The ventilator will deliver a high-pressure known as the P-High and will give you that pressure for a long period of time known as the T-High. Then the ventilator will allow short intervals known as the T-Low where the pressure will be allowed to drop to zero or a low pressure known as the P-Low. The crux of this theory is to keep the lungs open and expanded at higher pressures for longer times thus increasing mean airway pressure to improve gas flow and distribution and optimize oxygenation and prevent atelectasis. The patients can breath spontaneously throughout the high and low pressures, which adds to this modes comfort level. Ideally the lungs may have low compliance and thus be stiff, so during these short periods at low pressure the lung will quickly deflate but not totally collapse, as the T-low periods are too short. Normally you set the low pressure to zero relying on the fact that the t-Low is so short that the lungs will not fully deflate and never collapse therefore will have some degree of auto-peep due to the retained volume that doesn’t have time to escape.
A way to think about APRV is to picture yourself driving in the passenger seat of your friends car driving 80 mph. You then stick your head outside of the window with your mouth open (spontaneously breathing) and pressure hitting you at 80 mph is like the P-High and the length of time you keep your head outside the window is the T-High. Then you very quickly stick your head back into the car (still spontaneously breathing) and this brief moment with your head inside the car is the T-Low and the low pressure in the car in the P-Low. Keep repeating this over and over and you have APRV, but I warn you to not actually try this in real life, just picture it please!

Figure 7: APRV
Respiratory Rate:
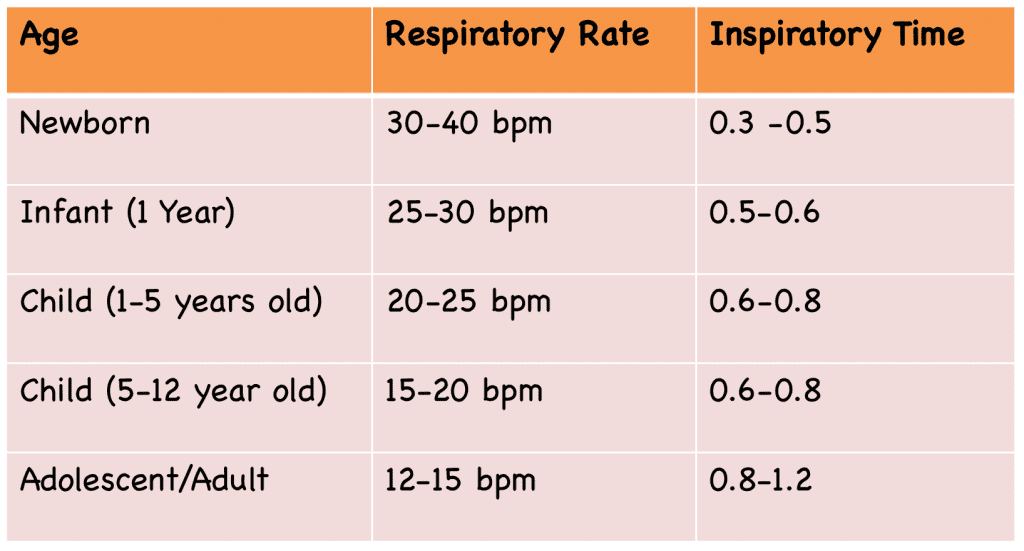
This is truly the main way we improve ventilation as we typically set up the tidal volume at 6 mL/kg based on ideal body weight and try not deviate too far from this. As we discussed, if a patient has a severe metabolic acidosis then we will want a very high respiratory rate and if a patient has obstructive physiology, we will want a low rate. For both of these patients, you will want to check a blood gas after 20-30 minutes, and then re-adjust your rate accordingly. Recall if you rate is too fast then you may develop auto-peep so may have to either decrease your rate or adjust your inspiratory time or inspiratory flow rate. We discussed that the majority of patients tolerate permissive hypercapnea (or submissive hypercapnea) with the exception of pregnant females, patients with serious head injuries who have elevated ICP, and those with severe pulmonary hypertension. These patients may need more sedation, as the effects of hyperacapnea can be uncomfortable.
When you intubate a pediatric patient they will require a higher respiratory rate, which for them may be a normal respiratory rate.
 Table 2
Oxygenation & Ventilation
Inspiratory Time/Expiratory Time/Flow Rate:
We have discussed this in other sections modifying I:E ratio for different reasons. If you want to increase a patients mean airway pressure and give higher inspiratory pressures then allow a longer inspiratory time. If you’re dealing with obstructive physiology, then you may have to shorten the inspiratory time allowing a breath to go in quicker and therefore give a patient more time to expire. Often patients may be uncomfortable in general and adjust the speed in which you deliver the inspiratory breath may also improve a patients comfort.
For More on This Topic Checkout:
- Frank Lodeserto at REBEL EM: Simplifying Mechanical Ventilation – Part I
- Frank Lodeserto at REBEL EM: Simplifying Mechanical Ventilation Part 2 – Goals of Mechanical Ventilation & Factors Controlling Oxygenation and Ventilation
- Frank Lodeserto at REBEL EM: Simplifying Mechanical Ventilation Part 3 – Severe Metabolic Acidosis
- Frank Lodeserto at REBEL EM: Simplifying Mechanical Ventilation Part 4 – Obstructive Physiology
- Frank Lodeserto at REBEL EM: Simplifying Mechanical Ventilation Part 5 – Refractory Hypoxemia & APRV
Post Peer Reviewed By: Salim R. Rezaie, MD (Twitter: @srrezaie)


